DIY Hexagon Panel Accent Wall
Hi all! I wanted to tell you about how I achieved this DIY hexagon wall panelling design.

I had been looking to do an accent wall somewhere in my home for quite some time - I debated between getting peel-and-stick wallpaper (I loved this look!), or if I should try my hand at painting a mural (thankfully, I did not do that), when I came across this photo on Pinterest! I was instantly inspired, and set about figuring out how to recreate the look in my own home.

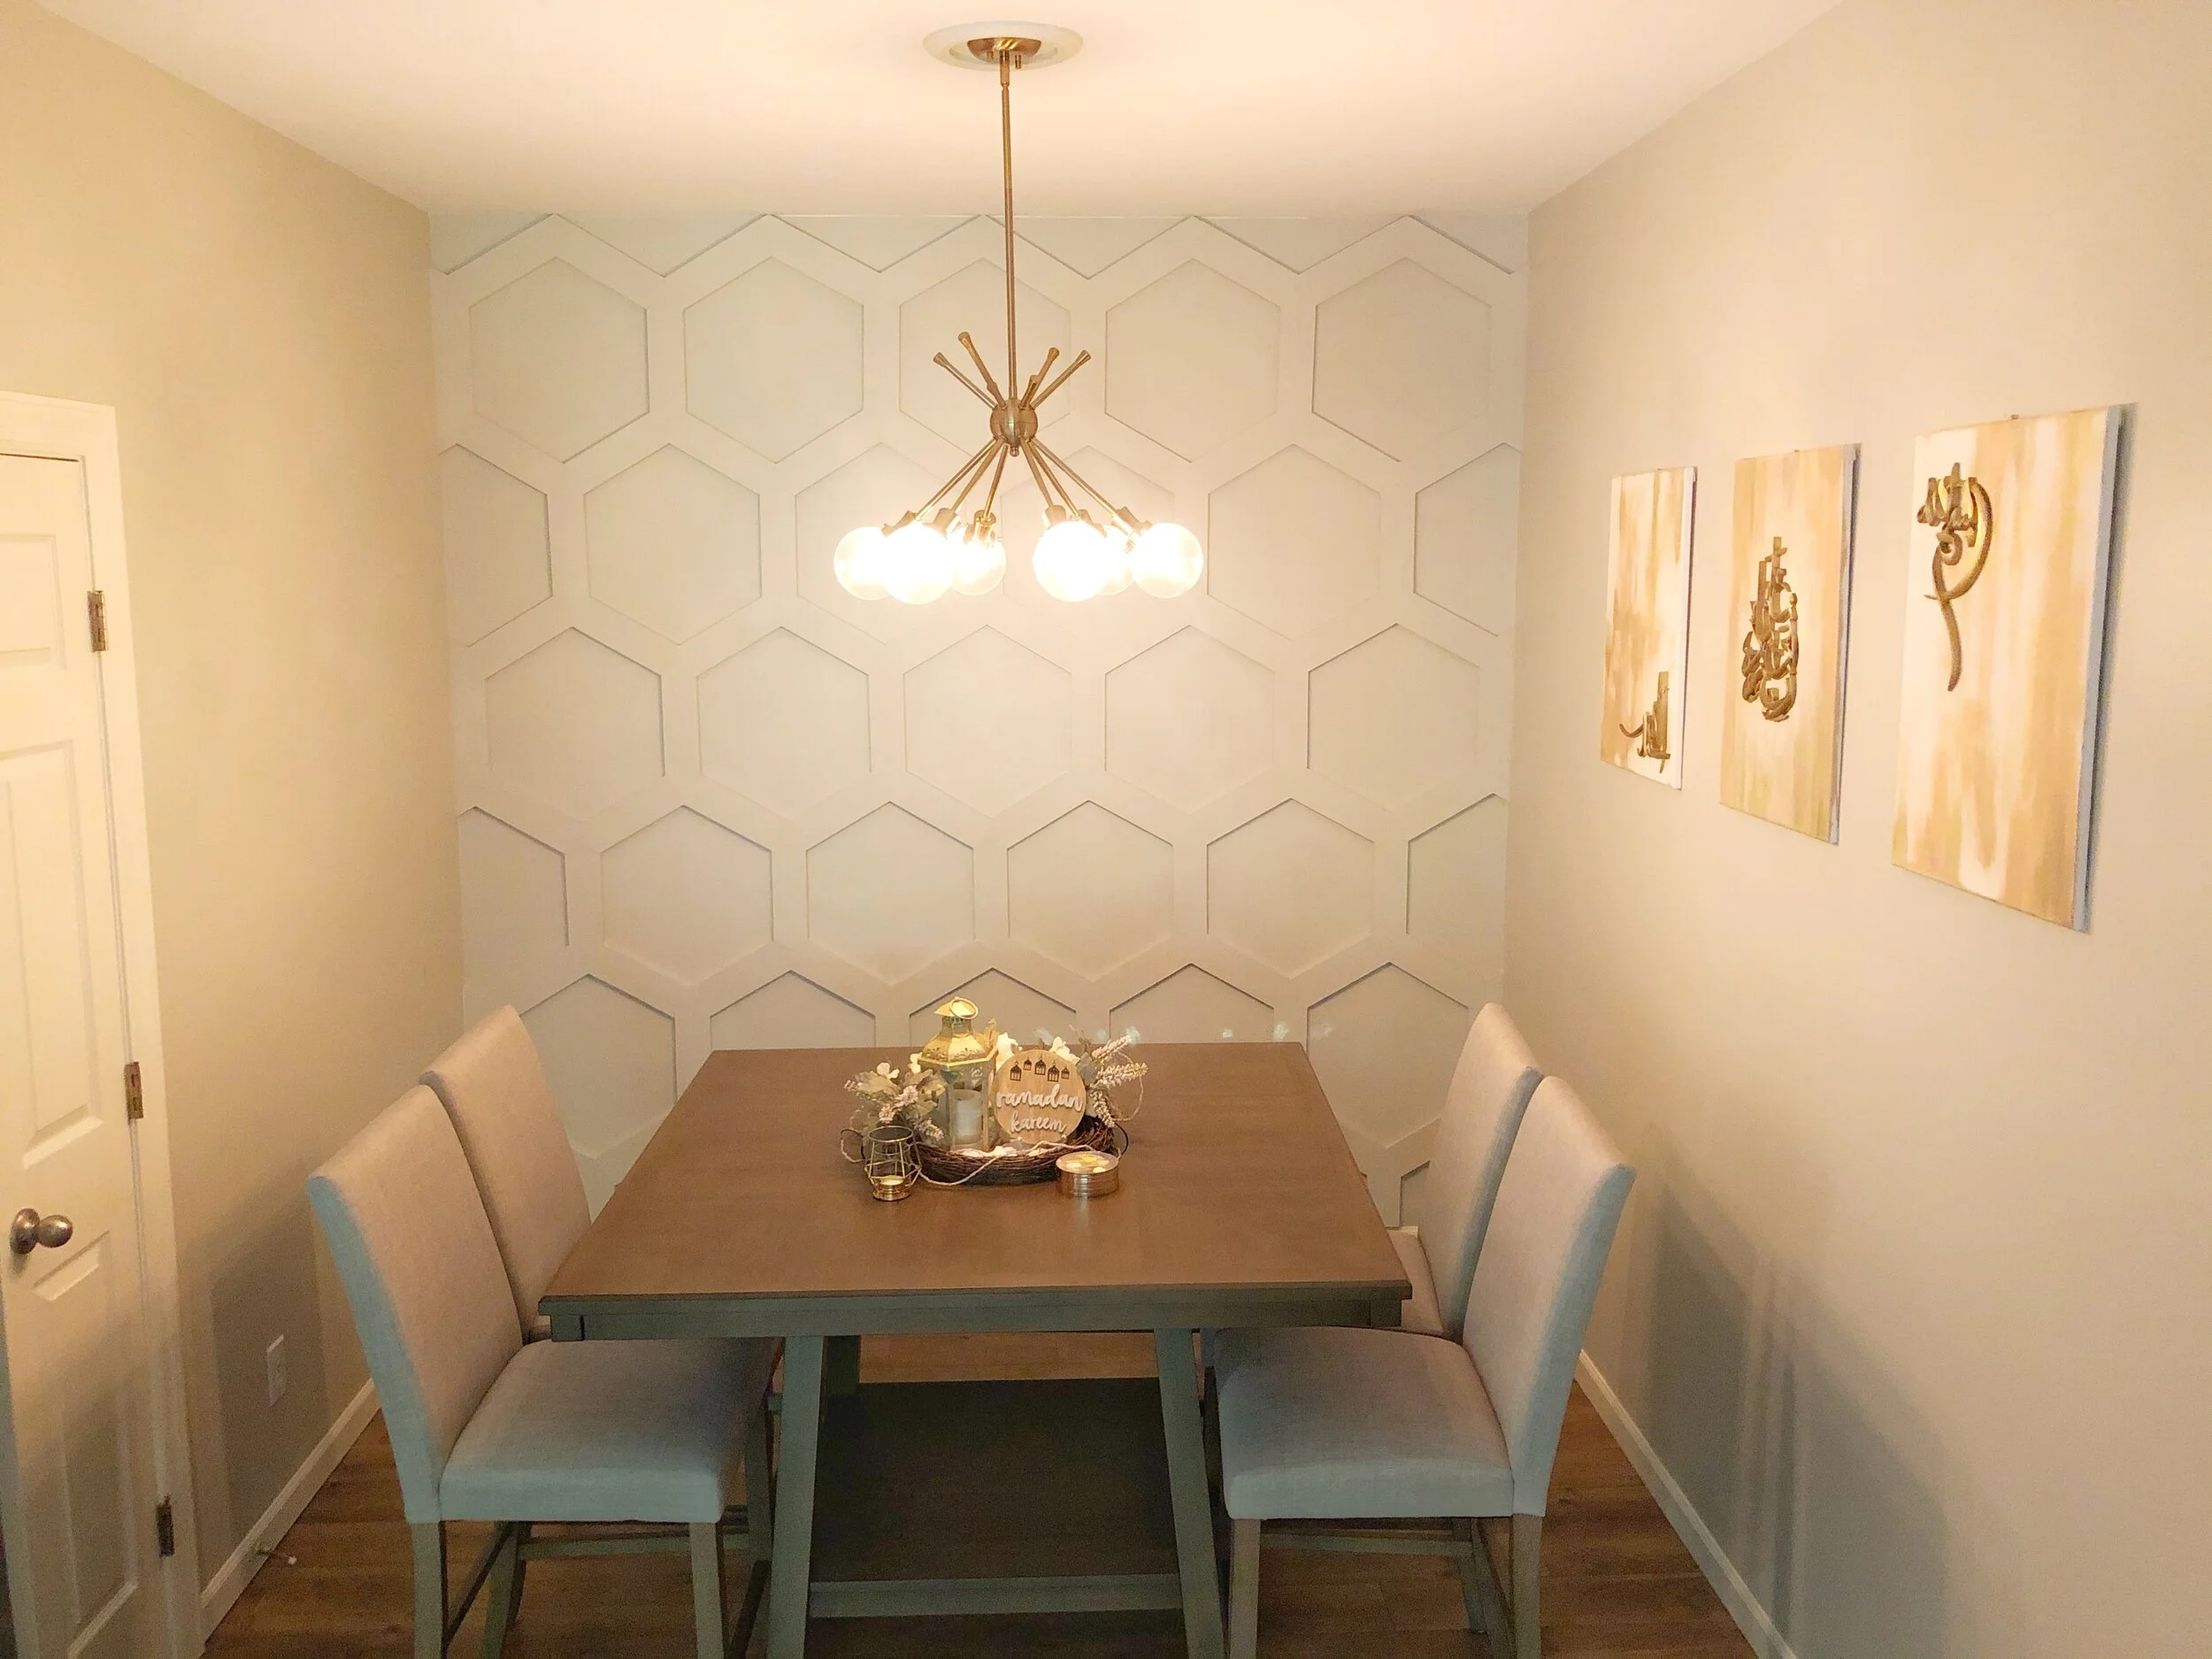
One of the first things I noticed when I saw my place for the first time was the light fixture - and not in a good way. I strongly disliked it, and it was one of the things I knew I immediately wanted to change out (read more about the fixes I hired a contractor to do in a future blog post), and ended up with this one. Though my fixture was now better, there was a lot of empty wall space that needed decor. I started by painting and hanging canvases with my beautiful Khitati carved calligraphy pieces, but there more to be done. Here’s how I went about re-creating my Pinterest vision:
Step 1: (Lots of) math, and prep
If any of y’all are wondering what relevance high school math classes have in your actual life, DIY home decor is probably it. I spent a solid few days measuring out my wall, figuring out the size of the hexagons I wanted, and how many wood pieces I would need to achieve the look.

After some blog post researching, I had originally wanted to use an 8’x4’ MDF board cut into 96- 12” x 4” pieces as my panelling pieces. A conversation with a nice Home Depot lumbar department employee changed my mind immediately, as I did not have table saw capabilities to do the precise cut down. I did, however, have a phenomenal DIY friend who let me borrow her mitre saw and nail gun, the former of which is necessary for this project.
Step 2: Purchase your materials
I ended up deciding to go with common board 1”x4”s for my panelling pieces (which is actually 0.75” x 3.5” - the more you know… also, this slightly threw off my math prep but it worked out). For my 9’x9’ wall, I calculated that I needed 82 regular 12” panels, 5 bottom panels, and 6 side panels. I initially bought 8 pieces of 10 foot 1”x4”s, which a kind Home Depot employee cut down to 12” pieces for me. I forgot all the math I had done and therefore only had 80 panel pieces when I needed 93 pieces, so on a second trip, I got 3 pieces of 6 foot 1”x4”s cut down to 9 - 12” pieces and 6 - 18” pieces.
A list of all the items I ended up needing/ buying/ borrowing:
1”x4” common board, cut down to 12” pieces, in the number that you need for your wall
Mitre Saw (borrowed)
Brad 18 G nail gun (borrowed) and 1.5 inch nail gun nails, OR
Caulk gun
Elmer’s Wood glue
Wood sandpaper
Mini foam roller paint kit
Painter’s tape
Paint brush and foam brush
Wall paint, left behind by previous owners
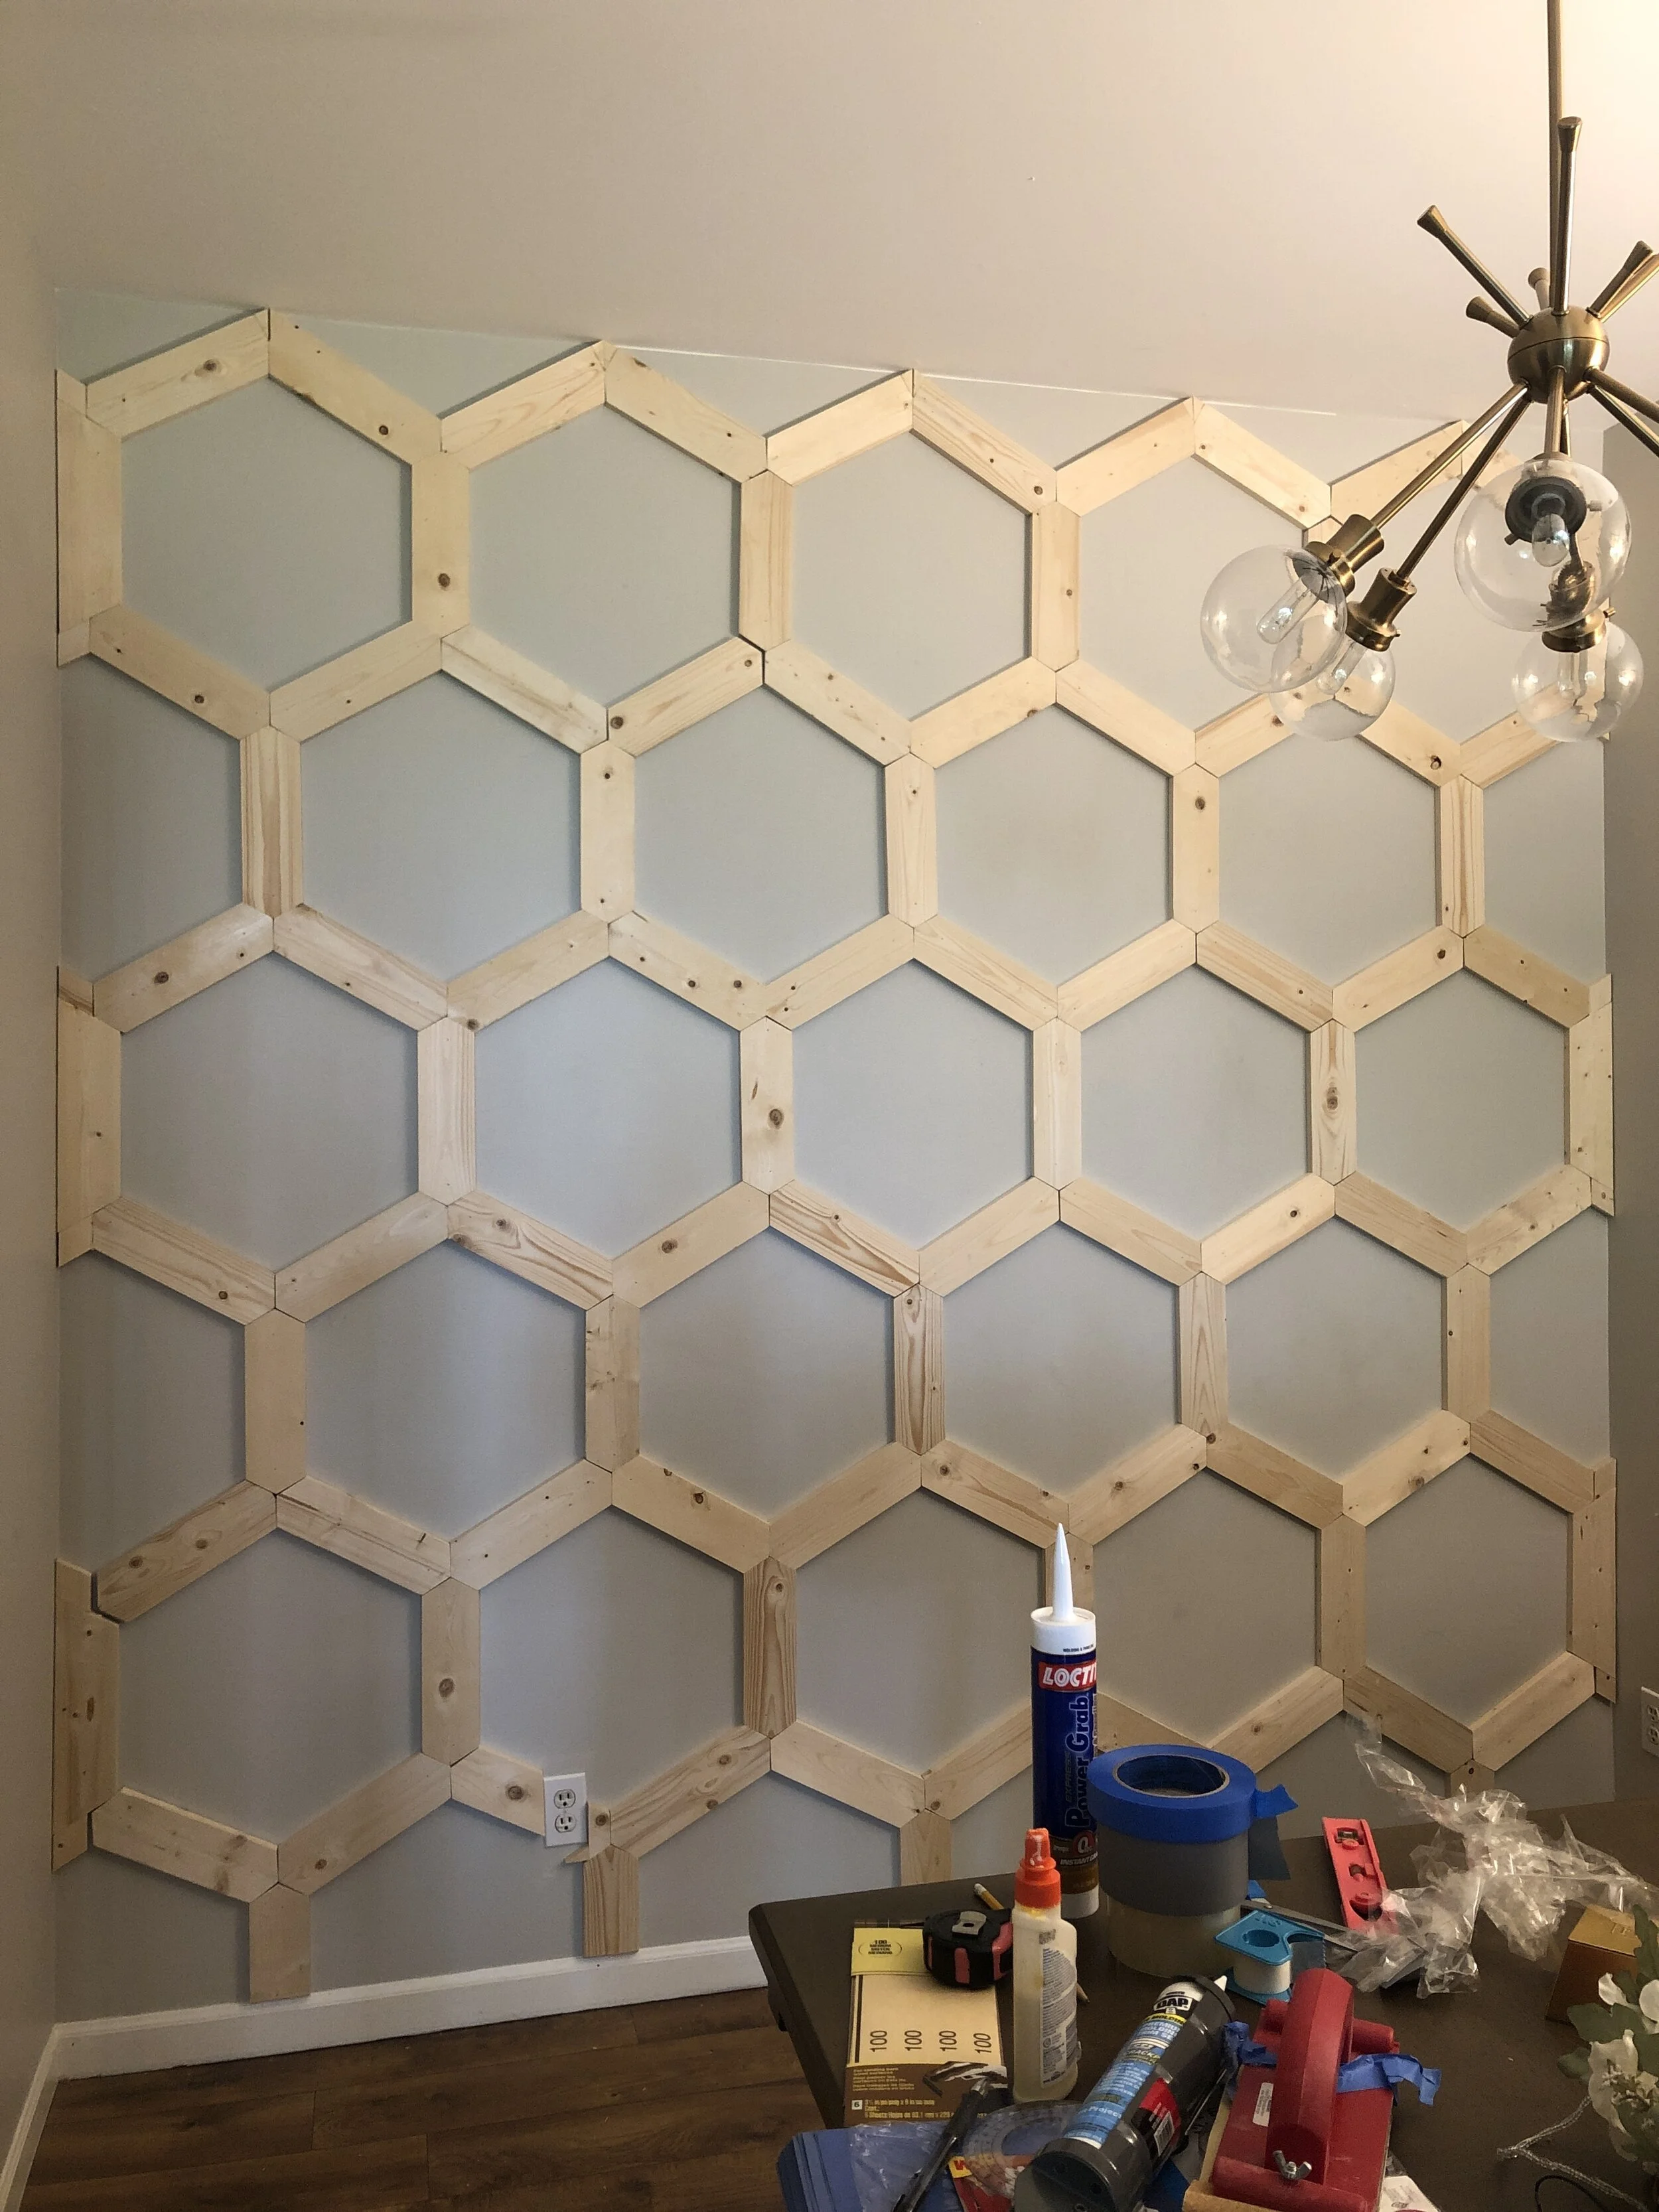
Step 3: Cut pieces down to size
Now that we have all of our materials, the next step is to take the foot long panelling pieces, mark midline, and cut 30 degree angles to midline on each of the four corners with your mitre saw. This allows for three pieces to come together to form the 120 degree angle for the hexagonal corners. I was very intimidated to use the mitre saw at first, but you pick up the hang of it very quickly. It only took me about 30 minutes to cut all the regular pieces down to size. The side, bottom, and top pieces all took a little bit of extra planning and cuts, which you can see in the diagrams below. I actually cut the side and bottom pieces last, after I had put a row up on the wall, for more accurate measurements.


Top- Make only one side of the mitre cut on two adjoining top pieces, and when connected, you’ll have a diamond shaped size hole at the top. I used the scrap pieces from all of the other mitre cuts and inverted them to fit (math!!), and wood glued them on.
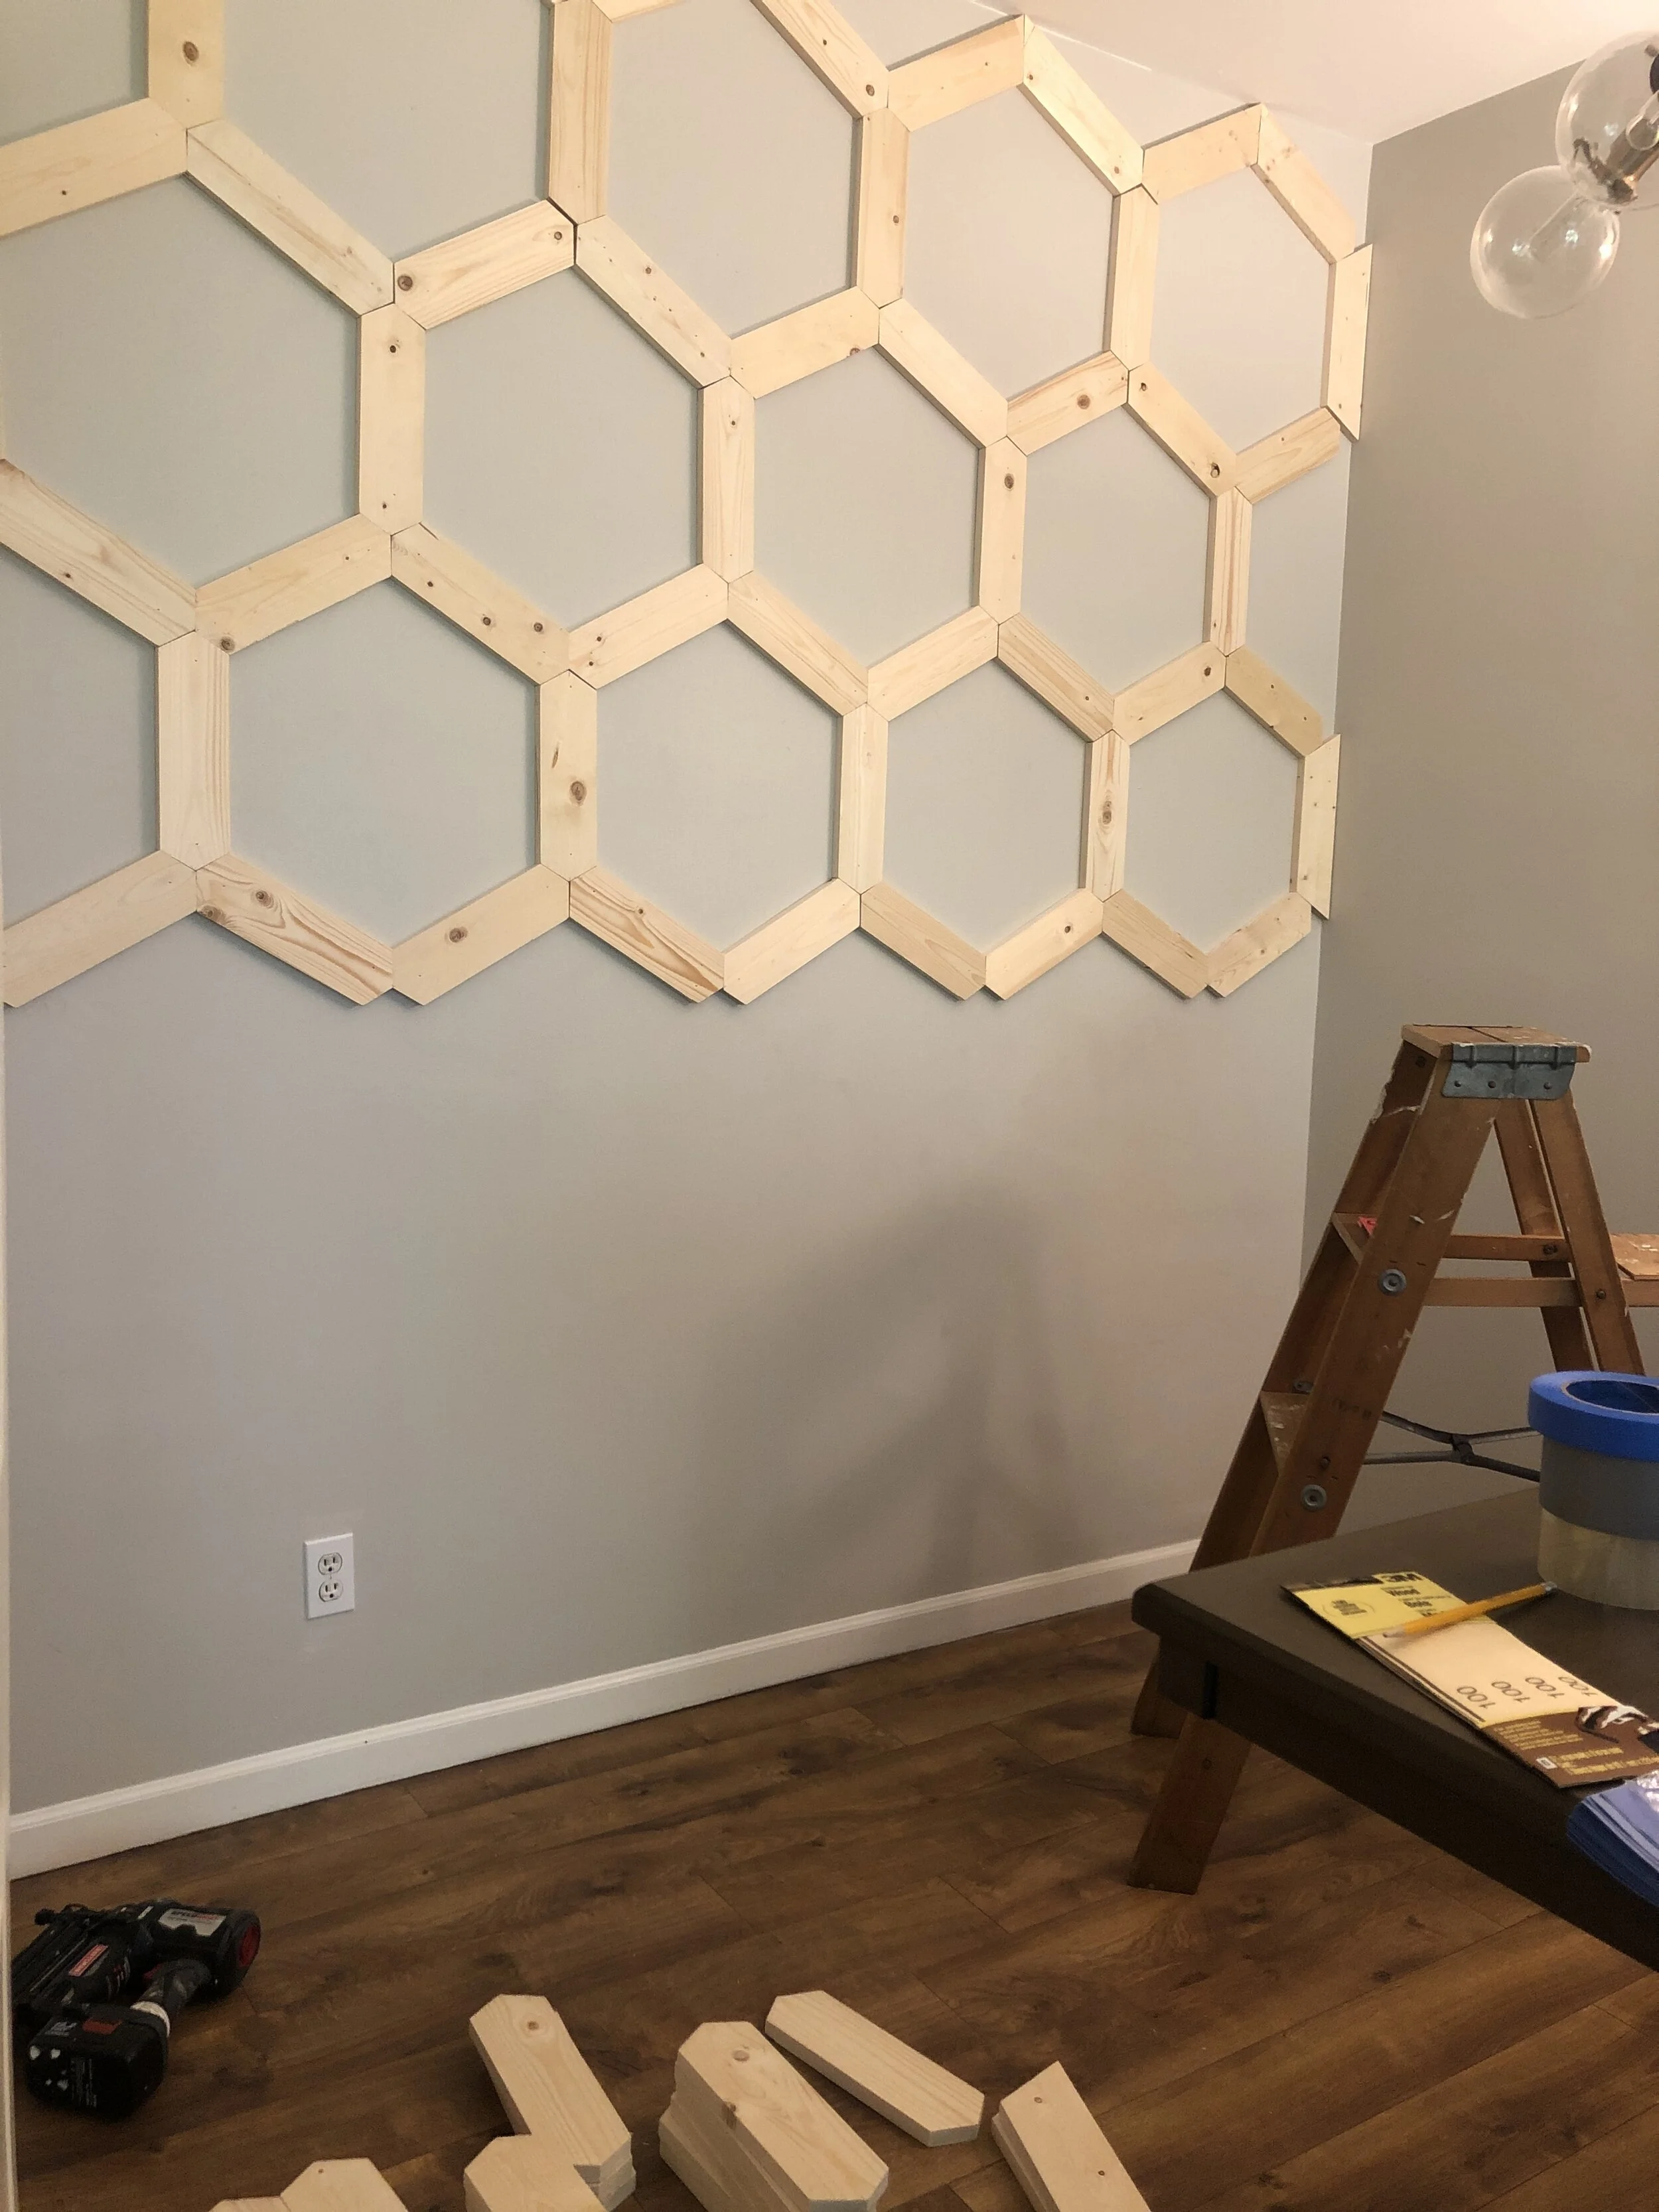
Side- My measurements ended up working out perfectly so that the side pieces fit flush against the two adjacent walls. As I mentioned previously, I had 6- 18” pieces and cut them down to the appropriate size. These were trapezoidal in shape, and then attached a small diamond (cut from the scraps of the same 18” piece) on top and bottom with wood glue to make the half hexagon shape.
Bottom- I cut each of these individually based off of the length that was necessary by the time I got to the bottom (based off of my original measurements, they needed to be 7.75” long, and I was within 0.5” of that for each piece). I chose to keep my baseboards and affix the panelling pieces flush to the baseboard. Since there was quite a difference in depth with the 0.57” panel pieces and the 0.25” baseboard, I did a small mitre cut along the bottom edge so that there was a gradual slope and decrease in thickness from the panel piece to the baseboard.
and then mitred the short edge so that there was no overhang, and it sloped into the thickness
Over outlets- honestly you could probably just cover it up, but depending on where it falls, mark it on that piece of wood and use the mitre saw to cut the appropriate angle.
Step 4: Adhering wood panelling to wall
Once the majority of your pieces are cut (and sanded!), the next step is to get them onto the wall. I was originally terrified of the nail gun, and had fully intended to use wall panelling adhesive (linked above) to glue everything to the wall. I changed my mind once I learned that there’s no easy way to remove the adhesive (if you try to take it down, the drywall it’s attached to will be destroyed). I’m glad I ended up using the nail gun regardless, because it was a super quick process. The 1.5” nails I purchased were the perfect thickness to go through the wood panel piece and through drywall. I wasn’t nailing into studs each time because each individual piece was lightweight and did not require it. I put up the top row (horizontal and vertical) first, then made meticulous measurements from the ceiling down to each 3 piece joint to ensure that everything remained level. The wood pieces were not all identical (ranged between 11” to 12”, some angles were not perfectly midline, etc), which made it slightly more difficult but I knew all gaps would be well sealed with wood filler.


Step 5: Final touches
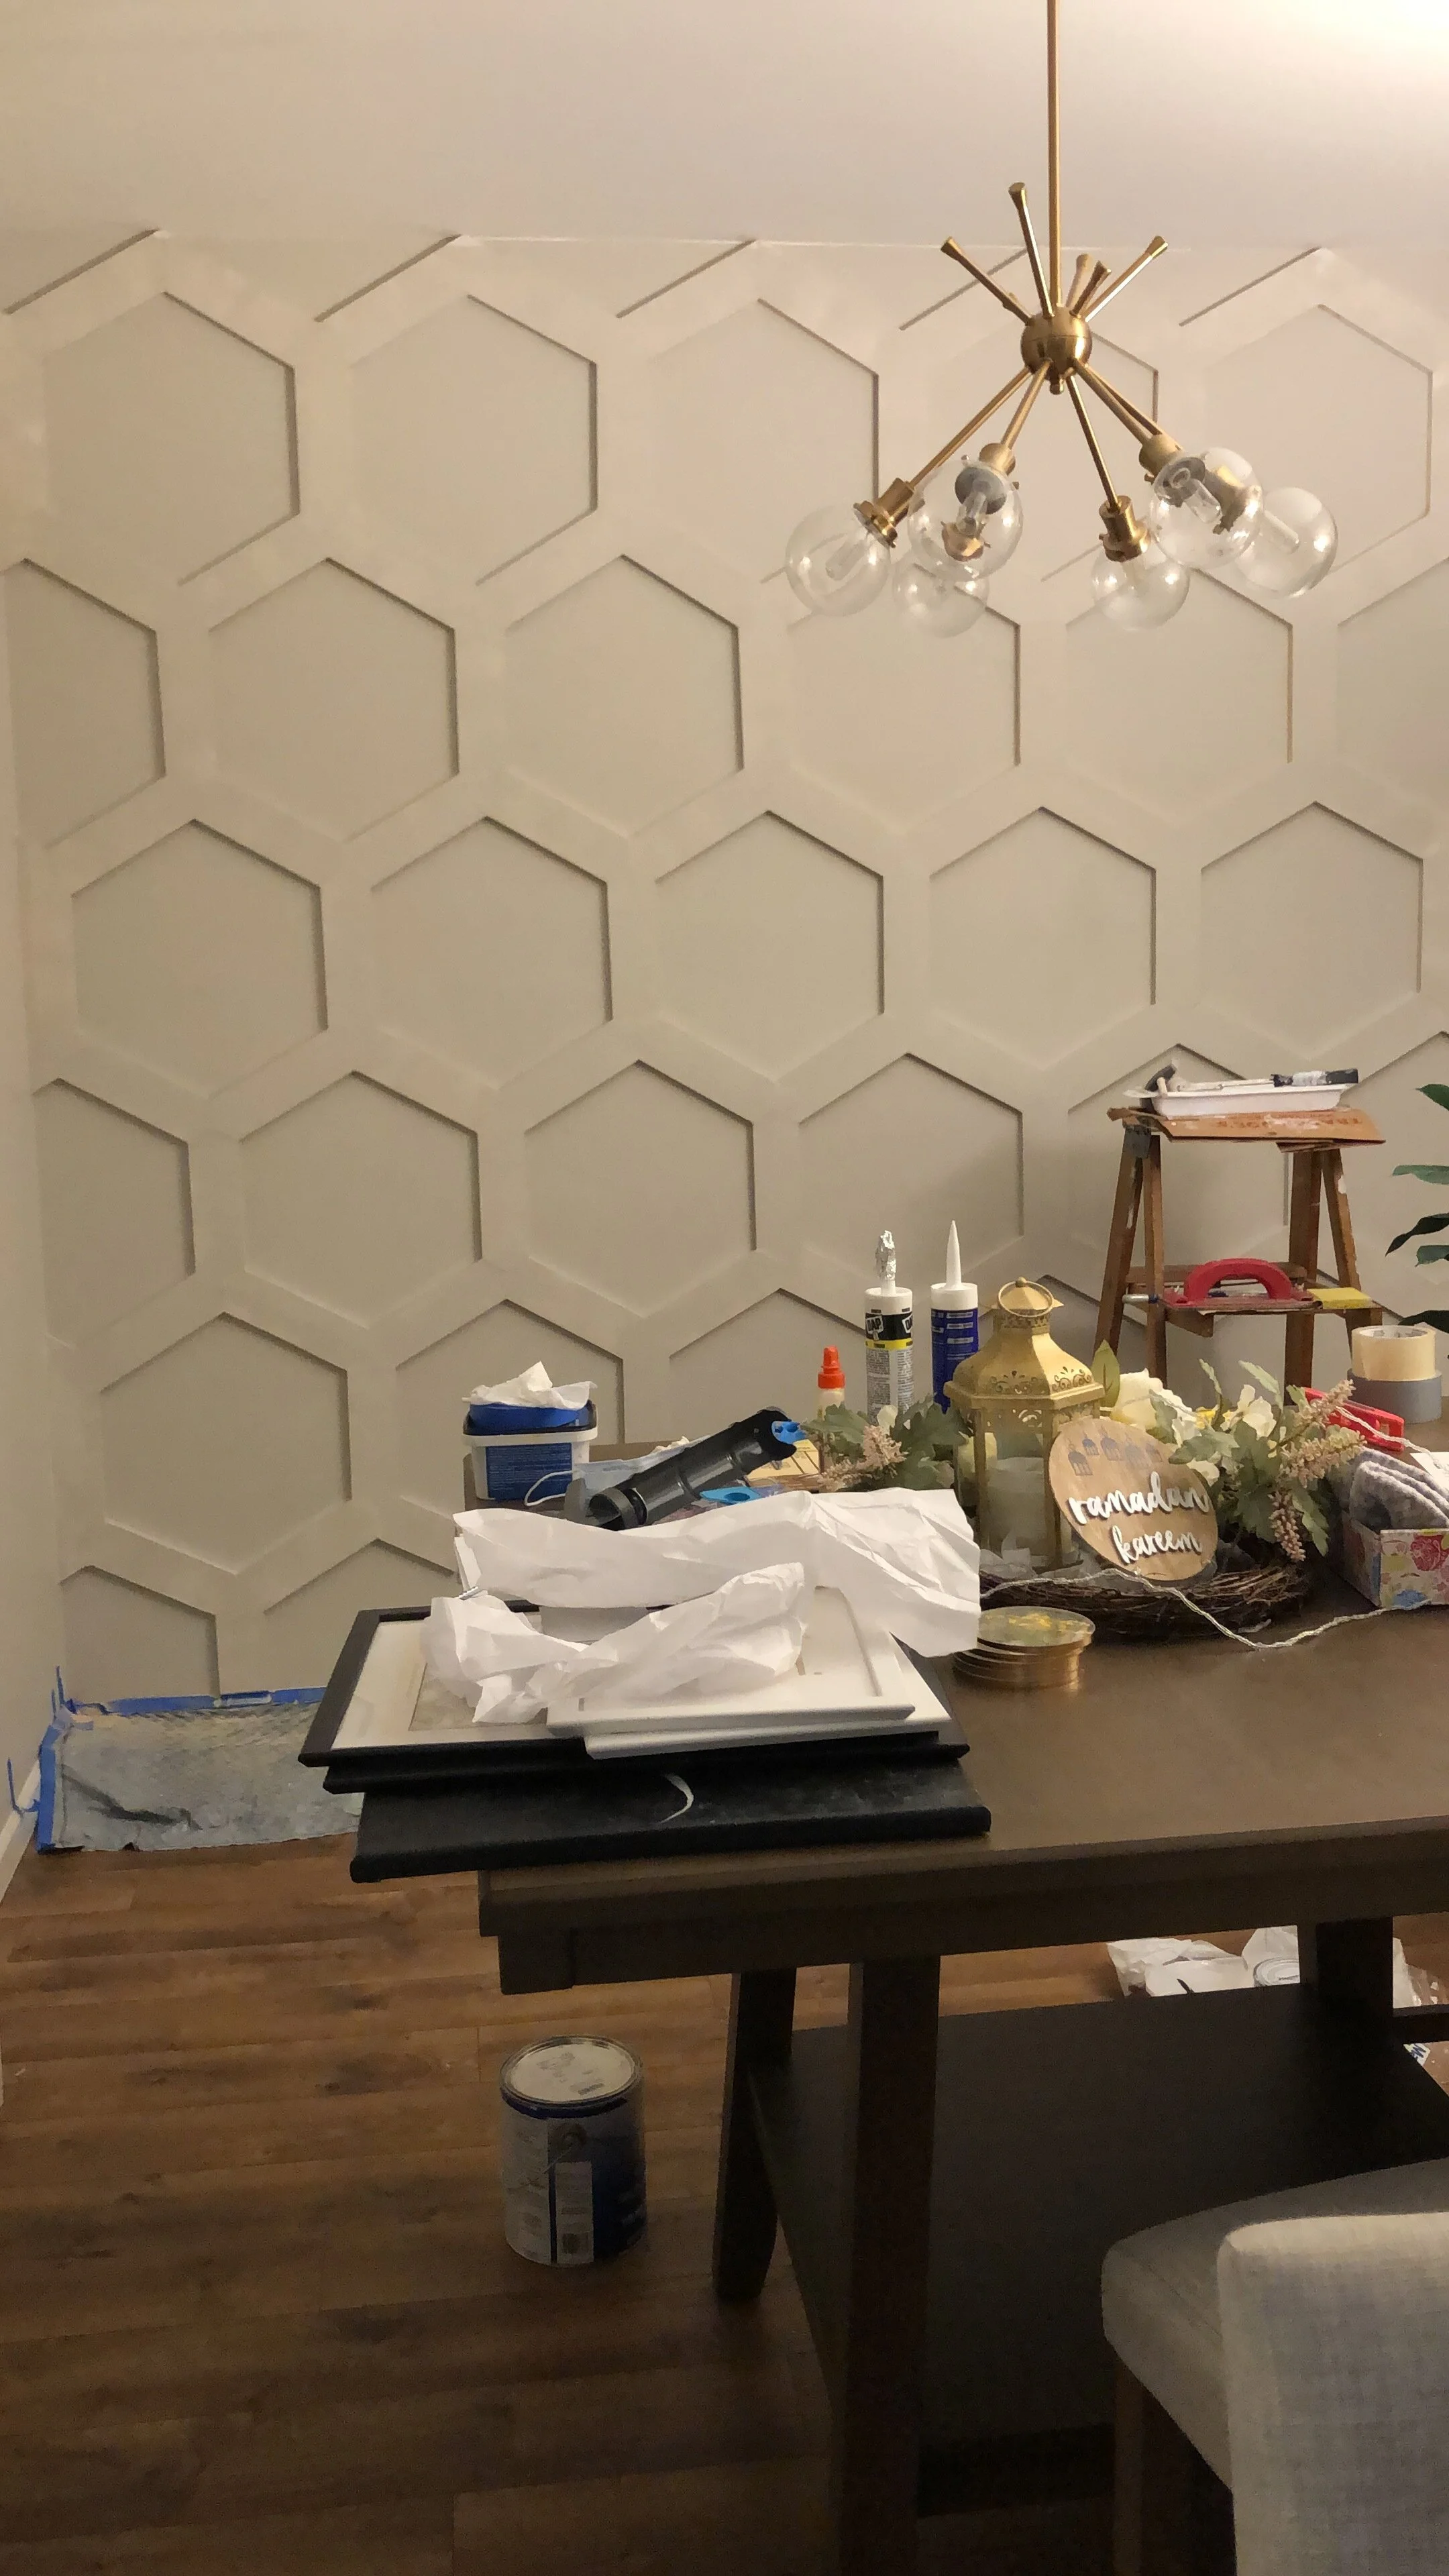
At this point, all the pieces were cut and up on the wall, and I was SO happy with how it looked (photo). I started using the plastic wood to fill in the nail holes, and all of the gaps in the joints (some more sizeable than others). I used the tub, but later learned that there’s also a squeezable tube option, which may have been easier to work with. Anyways, my wall itself was unfortunately not level, so some pieces stuck out further than others and no amount of wood filler would make it even, but I tried my best. Once the wood filler was dried, I sanded it all down manually (an electric sanding tool would have probably been wise here, but oh well). I chose to use silicone caulk for the edge pieces to blend it into the adjacent walls. I was debating doing the inside of each hexagon as well for further adhesion, but decided against it. I then ended up doing a double coat of primer on the flat surface of the wood, and none on the inside 1” sides of the wood. Once dried, I painted the panelling in the same shade as the wall behind it (Sherwin-Williams, “Agreeable Gray”), left behind by the previous owners.

And that’s it! It took 2 weeks, ~$100, lots of perseverance, but it came together perfectly and exactly how I wanted, and I can’t stop staring at my wall. I’ve officially been bitten by the DIY bug and can’t wait to do more fixes around the house on my off time. Let me know if y’all have any questions!